Building a Static Website on S3 Using Jekyll and CloudFront

Published on October 07, 2024
aws web_development cloud_security
10 min READ
Personal projects will ALWAYS end up taking more time than you expect. Let’s dive into how I created the website you are currently reading this on by using Jekyll on AWS S3 fronted by CloudFront.
Development
If you want to take the route of using Jekyll to deploy a website, it will require knowledge of HTML and, at the very least, the ability to look up how to perform specific functions with HTML and CSS. A quick overview of Jekyll is that it is a static website generator that transforms your plaintext into blogs, personal websites, business websites, and more. There are A LOT of different themes to choose from so take your time and choose wisely. Trying to pick a theme that matches what you are looking for as closely as possible will make all the difference. I used the Jekyll theme “WhatATheme” and it took me several rounds to find that one - by “rounds” I mean selecting a theme, downloading it, messing around with it for awhile, and then finally deciding it wasn’t for me. I also explored almost every page of themes on the provided lists from the Jekyll website.
Once a theme is selected, you have to ensure that you have downloaded all the requirements for jekyll to work locally. For any Mac users, I found how-to-install-xcode-homebrew-git-rvm-ruby-on-mac to be the most helpful for installing Ruby on my Mac. Once all of the requirements are installed the following two commands will need to run successfully.
bundle install
bundle exec jekyll serve
After those commands are running successfully you can load up your website locally in the browser via http://localhost:4000/ unless you set it up to use something other than the default port. When you can see your website in the browser it becomes a lot easier to troubleshoot and code as you go. This is where the HTML and CSS come into play as you make changes in order to get the website to look as desired. I would make a change to some HTML div tag by applying a CSS class to it and then reload to see how that change affected the element.
Traversing the Jekyll folder and file structure took some time for me to understand how Jekyll expects the files and where things are located. Especially after I was so used to Django - I will dive into that in more detail towards the end of this post. The biggest things to keep in mind are the following:
- _config.yml file - all of your website configurations
- _assets folder - all of your css and styling
- categories folder - all of the categories for your blog posts (optional)
- _layouts folder - your main base html pages, like contact or blog page
- _includes folder - all of the html that your main (_layouts) html pages include
- _site folder - the static website pages created when running jekyll serve or jekyll build
- .md files in root folder - the pages of your website, they tell Jekyll what html page to use
To get to this end result required a copious amount of Googling and maybe even a little ChatGPT here and there.
Deployment
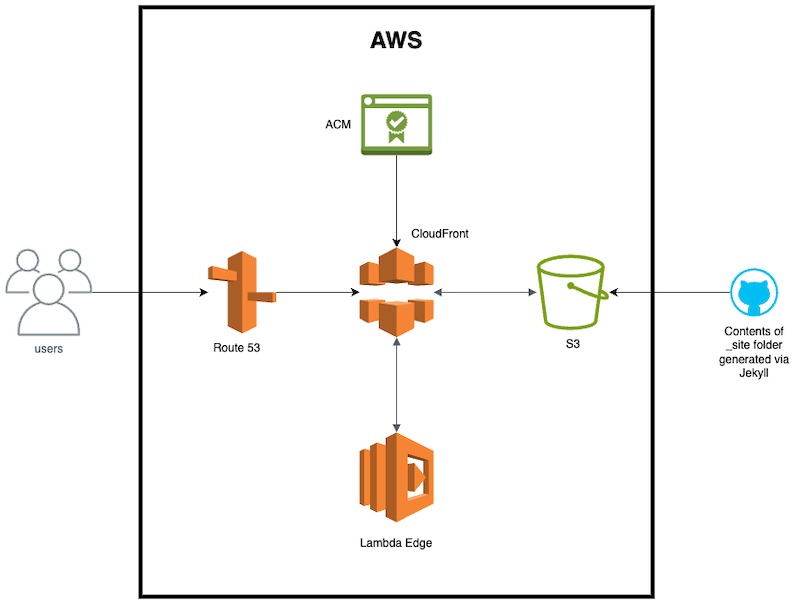
Once I was happy with how the website looked I had to create the infrastructure to deploy it to AWS. Luckily, I already had a Terraform project that I set up at the beginning of this endeavour of building a new website (more on that later). This project was stored in GitHub and had some GitHub actions that were already deploying resources to AWS. I retrofitted this project to deploy the necessary resources as shown via the diagram below:

The key pieces to this diagram are CloudFront and S3 as there are different methods to implement this connection. In my testing, only one method truly worked best for me though. AWS now has the ability to create an Origin Access Control (OAC) for limiting access to S3 buckets to specific CloudFront distributions. This replaces Origin Access Identity (OAI) which has now been deprecated. The issue I found with using OAC, however, is that it does not work well with private S3 buckets that have the static website hosting setting turned on.

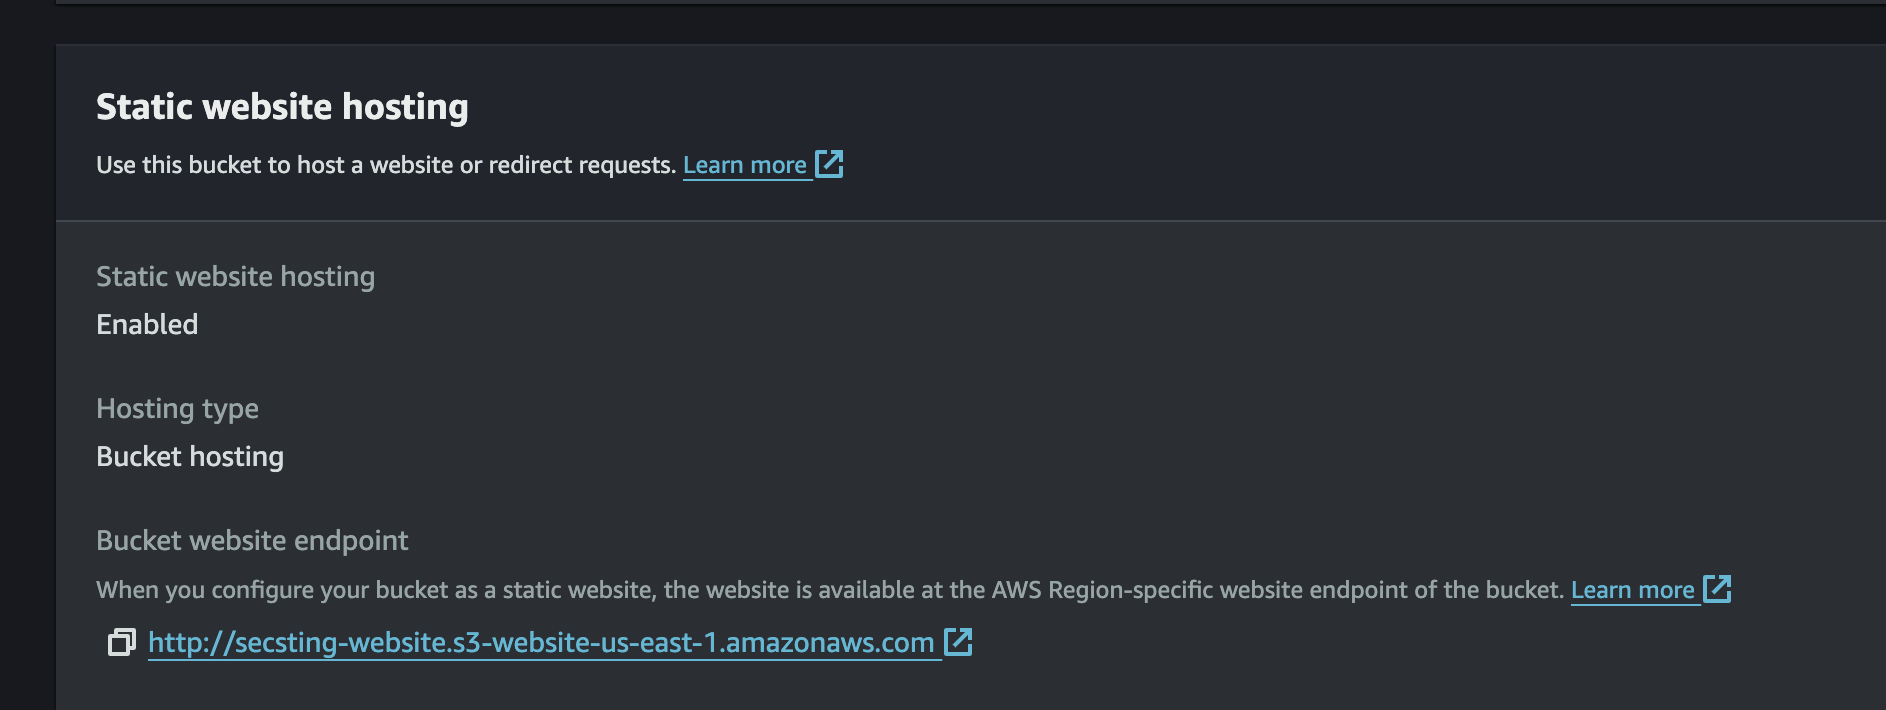
The reason for this is because CloudFront was getting “Access Denied” when trying to load the CSS and styling even though it was able to load the base html pages (meaning it had access to GetObject for the bucket via OAC). In addition, not having the “static website hosting” setting enabled makes it so that the S3 bucket does not serve the index.html page for root or subdirectories. If anyone knows of a way to make CloudFront OAC work with website hosting private S3 buckets please leave a comment or let me know as I would love to implement that. I could not find anything online on how to accomplish this or if it was even possible.
I secured this connection by making the S3 bucket “public”, yet restricting access to read from the S3 bucket to only requests signed with a specific header that my CloudFront distribution signs each request with. This was accomplished via the bucket policy on the S3 bucket and configuring CloudFront to sign each request with that same header. The code for the bucket policy would look similar to this:
{
    "Sid": "GetObjectViaReferrer",
    "Effect": "Allow",
    "Principal": "*",
    "Action": [
      "s3:GetObject",
      "s3:ListBucket"
    ],
    "Resource": [
        "arn:aws:s3:::secsting-website/*",
        "arn:aws:s3:::secsting-website"
    ],
    "Condition": {
        "StringLike": {
            "aws:Referer": "SampleString"
        }
    }
}
All this talk about CloudFront and S3, but Lambda also played a significant role in my use case. Lambda@Edge was required due to CloudFront not knowing which html file to load for a couple of web pages in the home directory. I wanted to keep the path for those pages “pretty” which means not adding .html to the path when accessing those pages. To accomplish this, the Lambda is utilized to do a quick rewrite of those URI’s every time one of those pages is requested. This can be observed in the index.js file. The categories folder also contains only index.html files in each category subfolder, so this Lambda was also used to add index.html to those URI’s. Essentially, the Lambda function helps CloudFront locate files that it wouldn’t otherwise find due to the path not being explicitly defined in the HTTPS request.
Now we need to get all of this deployed to AWS. That is where GitHub and GitHub Actions comes into play as that is the code repository I used and GitHub Actions is useful as a CI/CD pipeline that can run the Terraform commands to deploy resources. To set up the connection between GitHub and AWS I created a least privileged IAM role that only has access to create the resources I knew I would need. In order to assume that IAM role, an identity provider also needs to be created that trusts the GitHub Thumbprint for your GitHub repository. One thing to keep in mind when creating IAM policies or anything in your Terraform code that contains AWS account numbers, is that GitHub masks account numbers by default which will show as *** and Terraform will take that literally. On the GitHub Actions job step that does the AWS credential configuration the following line is needed: mask-aws-account-id: false
For example:
jobs:
  deploy:
    runs-on: ubuntu-latest
    defaults:
      run:
        shell: bash
        working-directory: .
    steps:
      - name: Git checkout
        uses: actions/checkout@v3

      - name: Configure AWS credentials from AWS account
        uses: aws-actions/configure-aws-credentials@v1
        with:
          role-to-assume: Sample_AWS_ROLE
          aws-region: us-east-1
          role-session-name: SampleSession
          mask-aws-account-id: false
After deploying the infrastructure for your website, we need to upload the static HTML and CSS code that was generated by Jekyll to the S3 bucket. This can be accomplished with automation via GitHub Actions to build and sync the content to your S3 bucket as part of a job every time your source code changes. Another method is to manually “build” the source code locally and s3 sync the content in the _site folder with the S3 bucket via the AWS CLI. The command to build the source code in the _site folder for “production” use is:
bundle exec jekyll build
All that’s left is to visit your domain in the browser and enjoy the results of your hard work!
Before AWS
Before moving to this setup, I was using a basic template from GoDaddy where they host everything for you and keep up with the maintenance of the website. Additionally, all you have to do is fill in the template with your desired content. The driving factor for me to make the transition to this website was learning how to build a website and using different AWS services as that is what I love to do (learning and using AWS). I have experience in securing the cloud and everything that entails, and I’m always eager to dive deeper in that topic.
Initially, I was looking at developing a Django application due to Django consisting of primarily python. Which, as a security engineer, I love and use often. I even had the Django website looking exactly as I was hoping for locally, but while doing some research on how to deploy the application to AWS I quickly found out that this option wasn’t going to be for me. I have nothing against Django and actually appreciate the way it is organized for how to configure it, but I do not want to have to maintain an EC2 instance long term and set it up to host a website. The price also played a factor as running an EC2 instance can rack up monthly costs even with having minimal traffic. EKS was eliminated from consideration as well due to it being around $70 a month just to use the EKS control plane which was a bummer because I was excited to get more experience with Kubernetes. So only local Kubernetes development for now.
Hopefully this post can help someone decide on what path they want to choose when creating a personal website and illustrates some “gotchas” that I personally had to get through. I want to thank Jimmy Dahlqvist for the inspiration of using Jekyll to create a serverless blog. If you have any questions or would like me to dive into further detail about any of these topics please reach out. I also intend to create a YouTube video on the process of creating this website. Remember to follow any of the socials for updates on new blog posts. I definitely want to keep this blog cloud security focused but I will probably write other topics from time to time.
THANK YOU FOR READING!! Be sure to follow me on BlueSky, LinkedIn, Facebook, or Instagram to get updates on new blog posts!
Don’t Get Stung,
-Security Sting